Wrapping Up My Journey!

I started this blog for my digital and online media class and never would have thought that I would find a new interest through it. This has been such a creative outlet for me and I am so thankful for having this opportunity! I have so many ideas for the future and am so thrilled to share them all with you! Thinking along the lines of improvement for the future, I believe if I spend more time researching and fine-tuning my topics, the posts will be better executed. I would also love to expand my content topics and explore more mediums. Promoting my content is another thing looking back, I could be more thorough and use more platforms.

In lieu of my project coming to an end, the best experience I have had with this blog would be when I posted my 10 Minute Mug Meals how to. I had the most views on my blog than ever before. It really showed me that when you put in just a little bit more effort, the results will be so rewarding. Looking forward, this blog will always be something i’ll have under my belt, especially if I go into the digital media field. This project shows the experiences I have and will continue to show, through growth in the future. I can definitely see myself being of use in the future, professionally with my newfound skills of creating and understanding a blog. In doing this creative project, It has also sparked my interest in possibly starting a YouTube vlog in the future. This has been, by far one of my favorite projects to ever take on.

Site Stats: My most popular week as for stats, was between February 11th and the 17th. This was around the time when I posted my This is Me intro and my compound butter how to post. I got a total of 49 views that week, my highest ever.
Yes, that’s not very impressive in the digital world, but with the little promotion that I have done, It is quite exciting to be seeing these results. The most views on a single post was my recent Friendship Bracelet DIY, with 23 views. It honestly surprised me to see those kind of results for a topic that simple. Although, it was one of my more informational posts so it makes sense. When looking at my site stats, I also noticed that a few fellow bloggers are following me! That is such an honor to know that people truly appreciate my content!

As for my twitter analytics, they’re quite similar when it comes to promotional tweets. My top tweet for this project was for my DIY Friendship Bracelet post, with a total of 5 likes! How popular I am!

I will always remember this challenging and exciting adventure and can’t wait to see what the future holds for me and my blog! Thank you, Dale Blasingame and Stephanie Robinson, for teaching us through this journey!

Make Your Own T-Shirt Scrunchies!

This is one of the blog ideas that I have been holding on to until the end of the semester to post. When we decided the topics of our blogs, this immediately popped in my head, but I knew this was probably the best idea I had. So here we are! After much research, trial and error, and plenty of fun, I have for you, DIY t-shirt scrunchies! The end result of these is so exciting, so let’s get going!

A disclaimer: As cute and fun these little guys are in the end, the journey is a bit difficult for an average teenage female without a sewing machine. If you have one, I highly suggest using it. Otherwise, put on some Netflix and expect to get poked by a needle a few times. But if you’re reading this, I’m sure you’ll be more cautious than I was! Maybe invest in a thimble!

Let’s get started! You will need a t-shirt that you don’t mind cutting up or scrap fabric, scissors, a needle, thread, and a ponytail holder or strip of elastic. With the trial and error previously stated, I found that using about 14-16 inches of fabric/t-shirt is perfect for a traditional scrunchie look. Depending on how wide you want your scrunchie, make sure to double the width when cutting. I made mine about 4 inches wide to have a 2-inch wide result.

I absolutely love how these turned out and hope what I’ve shared will allow you to have your very own, hand-made scrunchies! It is so fun to create such a useful thing for yourself and even friends! What really helped me in figuring out how to make these perfectly, was JENerationDIY’s youtube video. She shows how to achieve a scrunchie with a few different methods, such as hot glue!

Friendship Bracelets!

I know this probably seems a little silly, these were in style in the early 2000s. But recently, I have been going back to this little trend and have found some really cute designs! It is so fun to make these for friends and is honestly quite therapeutic! I just get into a groove and keep making them. Going along with friendship bracelets, macrame wall hangings have also popped up again. Macrame knots are actually very similar to these bracelets so it’s totally a 2 for 1 with this DIY! Once you learn these knotting styles, you’ll be an expert! Let’s get started!

Starting off with one of the most basic knots, this one is called the chevron pattern. Begin with 6 pieces of string, about an arm’s length each. Knot them all at one of the ends. I find it easiest to tape the knot to a hard surface or put a weight on it. Here are the steps below!

Next, a less time-consuming bracelet with very similar results! I honestly don’t know if this style has a name, but if it were to have one I’d call it the loop de loop! For this one, you will need 6 strings once again. This time, make each of your strings about two arm’s lengths. Because I had a difficult time taking pictures of the process, I made a video! Check it out to learn how to make this super fun and easy bracelet!

To finish off your bracelet, it really comes down to preference! I personally like to tie my two ends together. In the videos I have linked below, there are multiple different methods, like using a button or clasp. I hope you found this fun and helpful! : )

There are so many easy methods of making a friendship bracelet, so here are a few links to some videos that I found very useful for beginners!

Check Out My YouTube Video!

As many of you may know, I am apart of the Gamma Phi Beta sorority at Texas State University! This past Thursday we held our annual “Get Cheesy” event supporting our philanthropy, Girls on the Run. At this event, our in- house chef made tasty grilled cheese, with profits going towards Girls on the Run. We also had fun games like bean bag toss and giant Jenga for all the supporters that came out! It was an overall really exciting event!

I just made a youtube video, interviewing some of my sorority sisters with some footage of the event! Go check it out for some more insight! : )

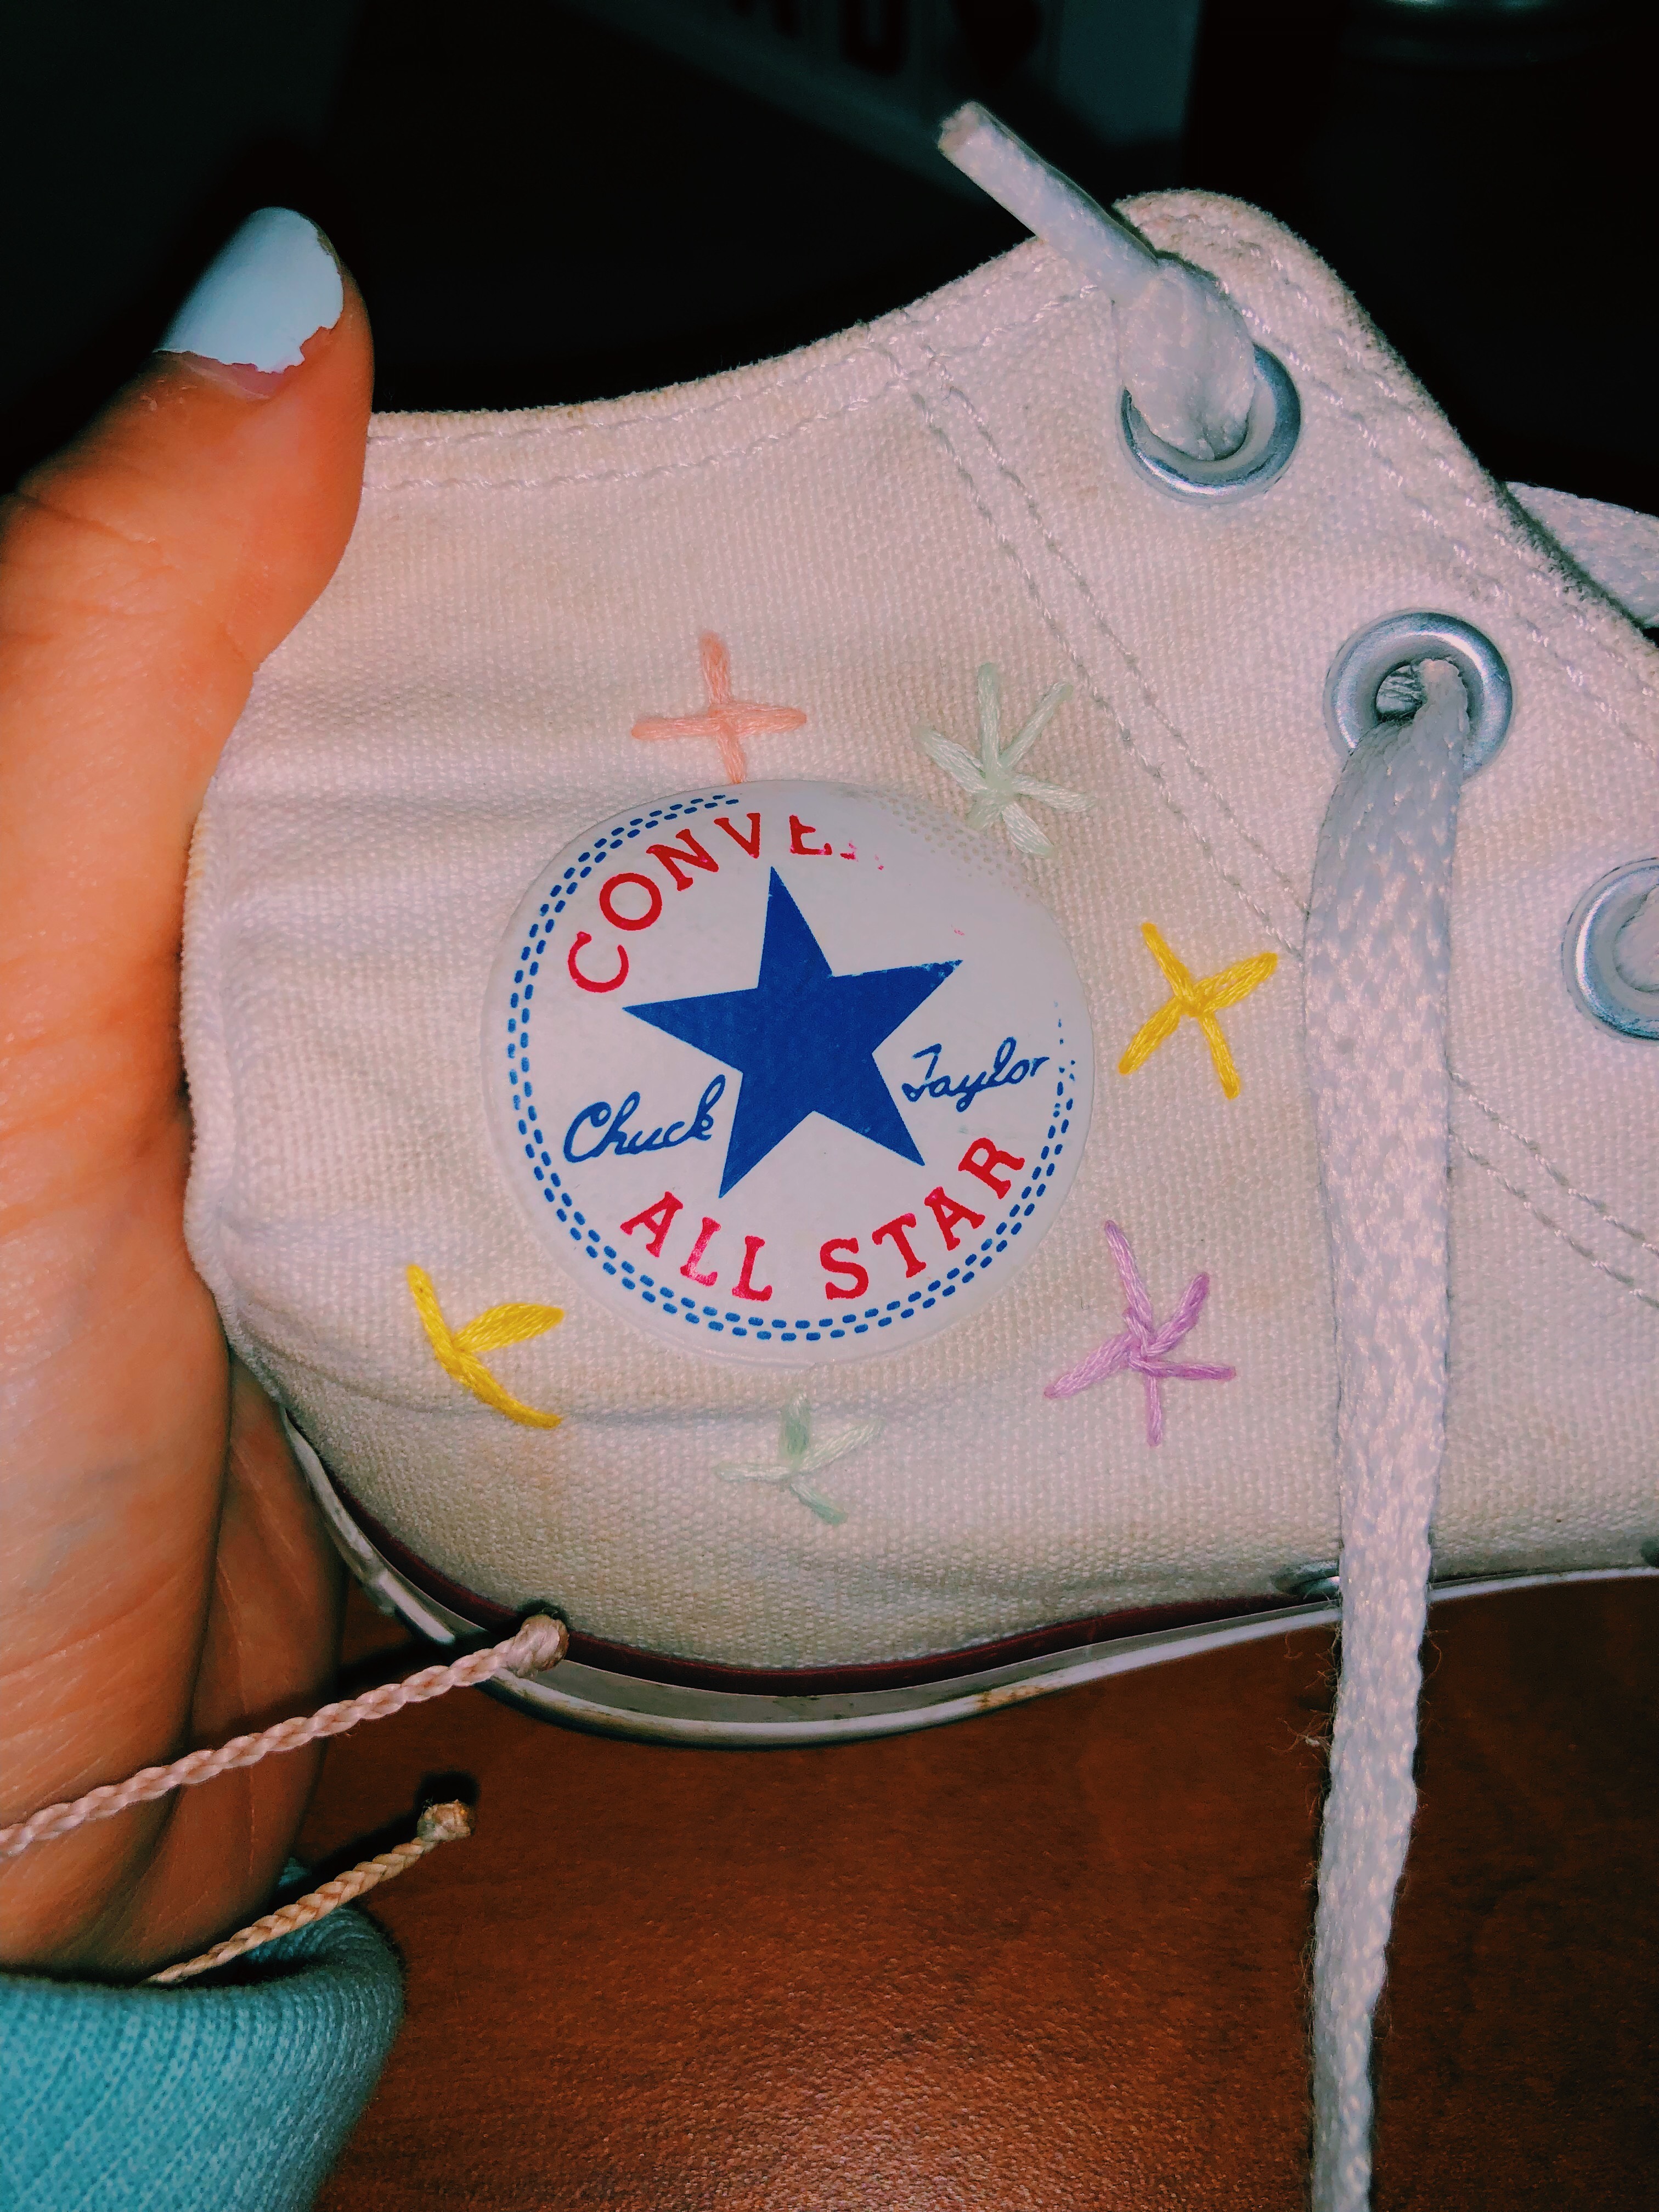
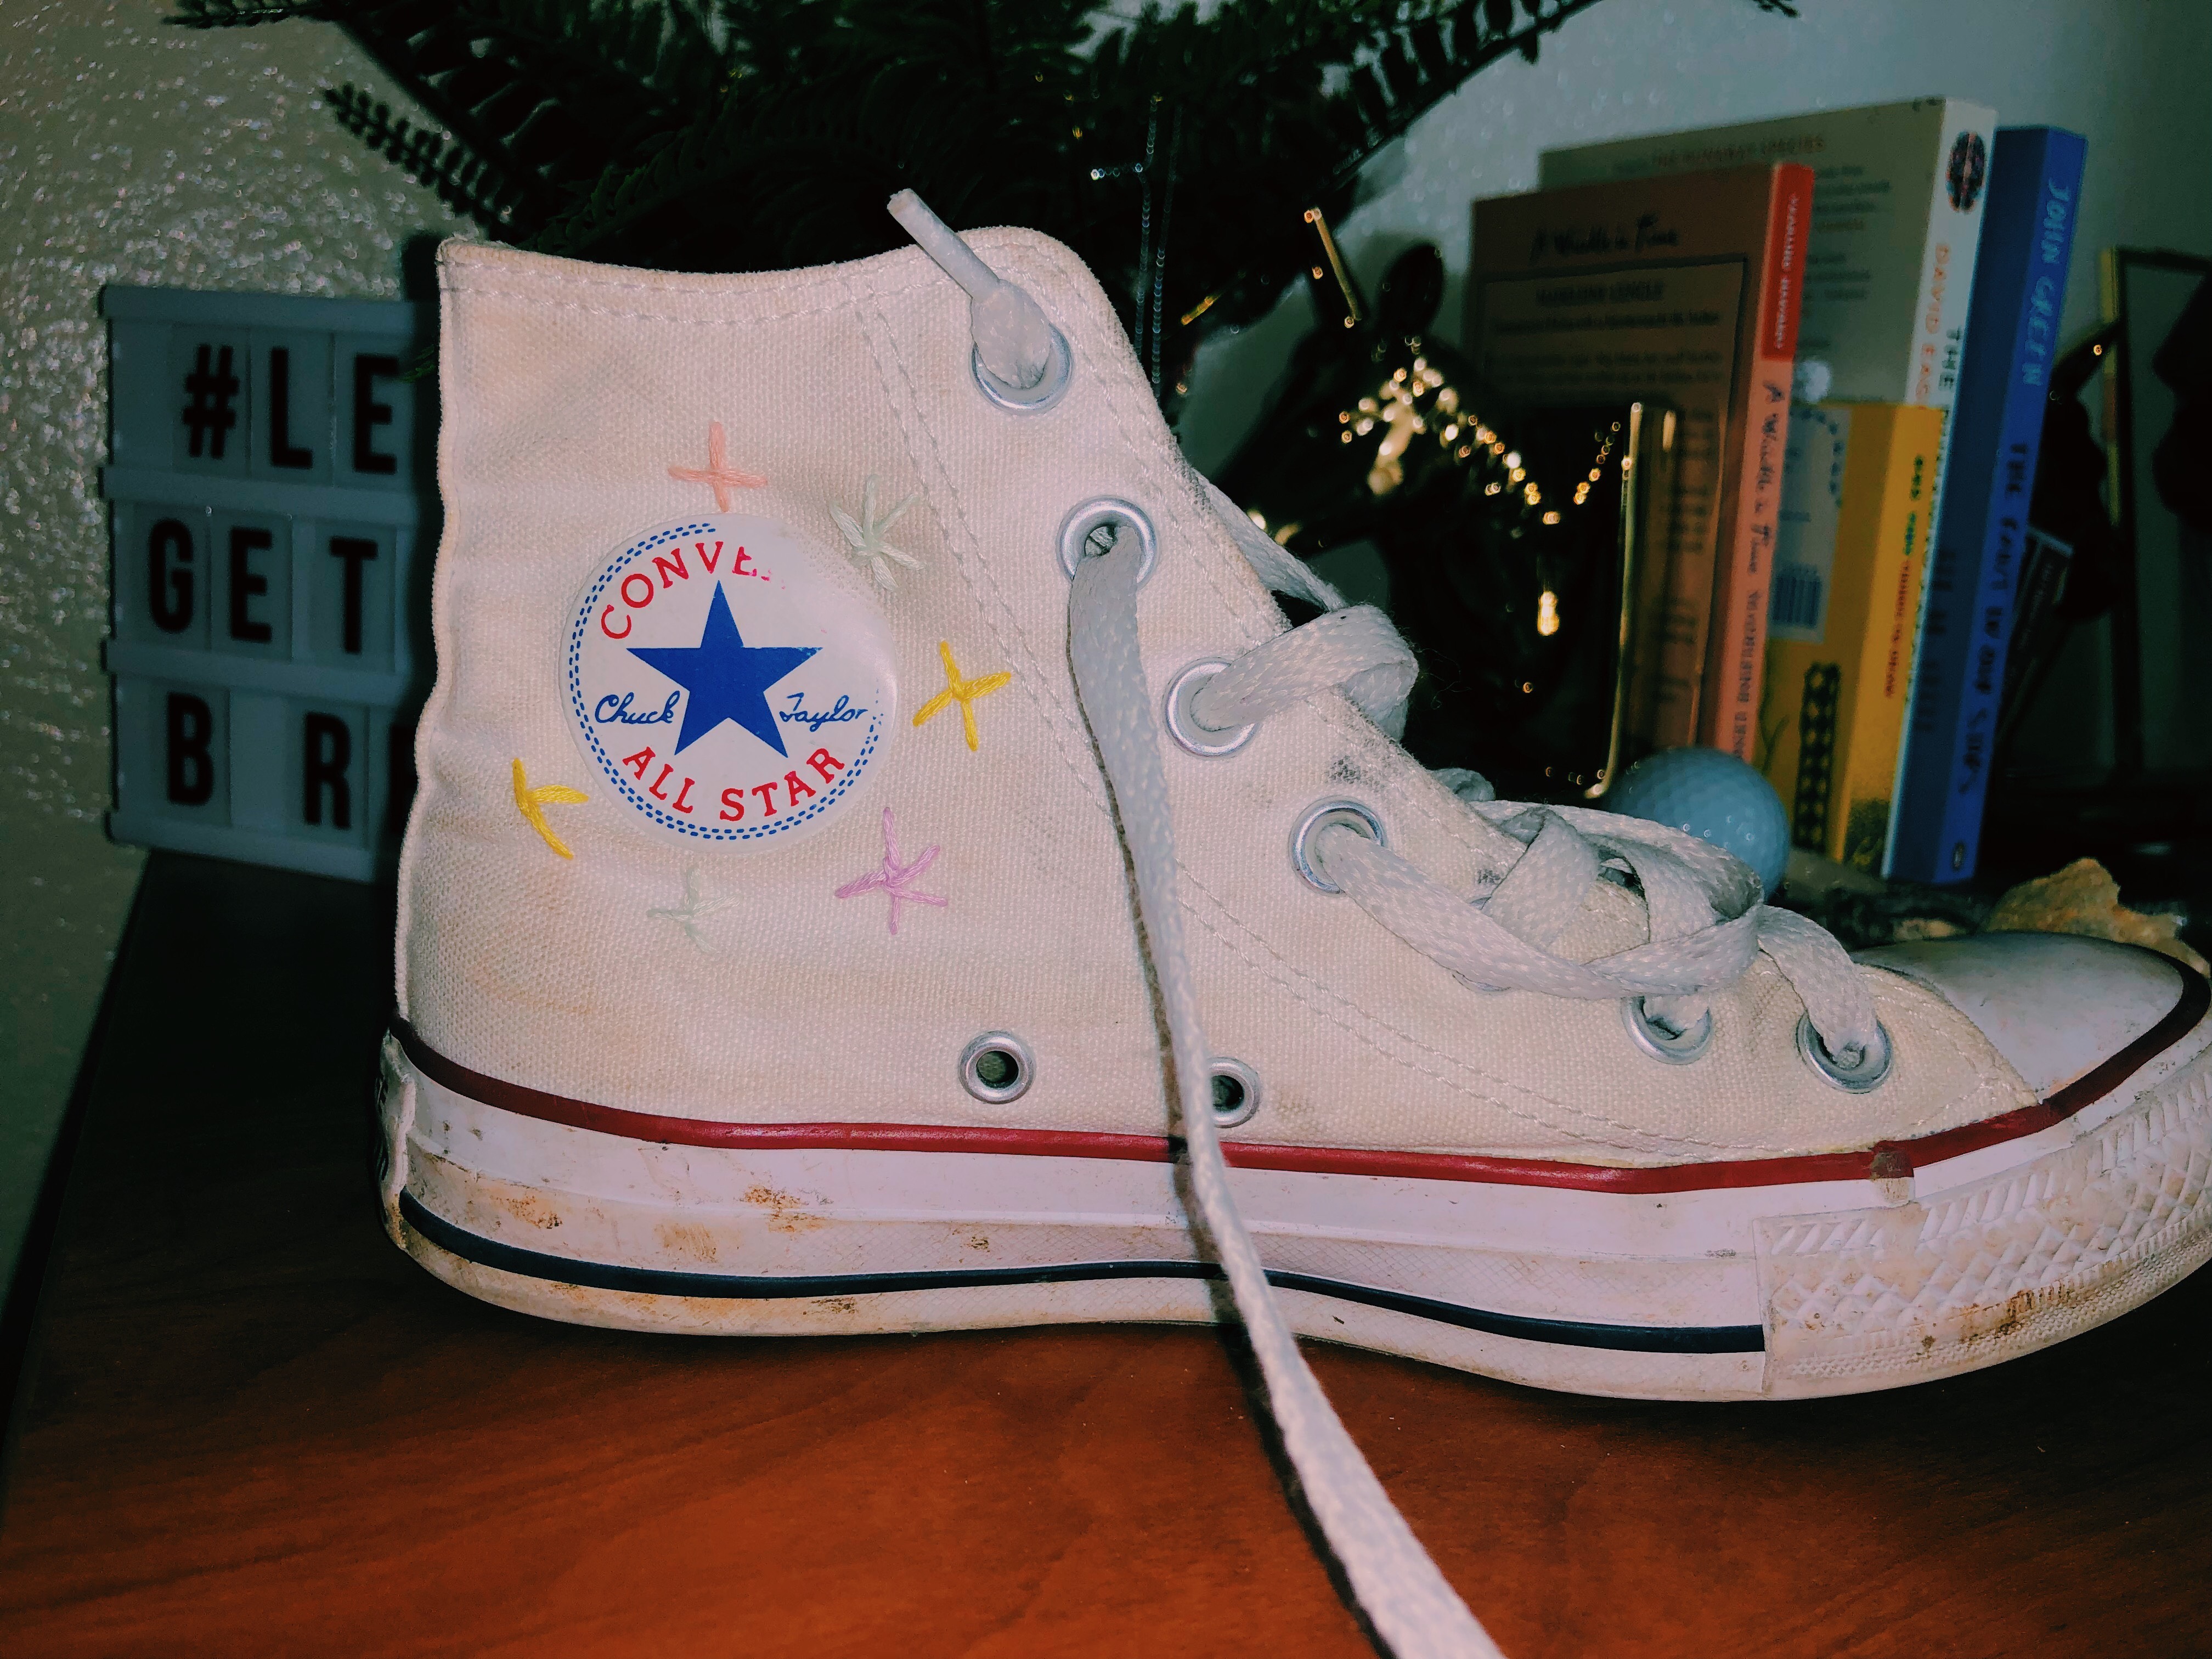
DIY Embroidered Converse

Almost everyone has a staple pair of high-top converse these days and with that comes with some un-originality. Yes, they are so cute and go with just about any outfit, don’t get me wrong. But why not be just a little bit more original? With this DIY, I am going to show you how to embroider your very own pair of converse! There is no set design, and that’s the fun part; to show your personality through it!

You will need:

  • Embroidery floss (used for friendship bracelets)
  • A needle
  • Converse

To get things started, use a pencil or better yet an erasable fabric pen to draw some rough drafts of your design. If you are a beginner just like me, try to make it simple to avoid messing up. Then pick your desired colors of string. Grab your needle, fish your first color through it (about an arm’s length), then knot the string at the end (repeat for all colors). Start your design by pushing the needle out from the inside of the shoe and you’ll be set!

Being that I am no expert, I looked to Pinterest and a couple of YouTube videos for guidance. I found Jade Rawson’s YouTube video to be aligned with my ideas if you’re going for something more simple. Brittani Louise Taylor’s YouTube video was also very informative for a good visual. The outcome of her converse was a little more detailed and crazy, but if that’s your idea go with it! I absolutely loved how the converse turned out and hope you all try it out to revamp your own!

10 Minute Mug Meals!

Living as a college student, cooking a proper meal can be really difficult. I currently live in a student apartment at Texas State University with an outdated kitchen. My stove top heats unevenly, the dishwasher doesn’t work, not to mention my oven’s inability to be an oven. I have had to become very creative with the way I can prep meals. Through this learning curve, I have discovered one of my favorite things; Mug Meals! To achieve these few quick and easy meals in a mug you will need just a few pantry basics!

I have linked below some more awesome recipes being that I cannot list every single one! But I have for you three of my all time favorites! The first mug meal is a traditional red sauce pasta and is legitimately the most simple thing. I love not having to go through the hassle of boiling water on the stove top, to then prep a large serving of pasta that I am unable to eat. Secondly, I have another foolproof recipe for a nice one serving cup of oatmeal with dried fruit. Lastly, my all time favorite that probably really isn’t in my favor, A CHOCOLATE CHIP COOKIE!

Red Sauce Pasta: For ingredients; any noodle of your choice (I prefer the shells), red sauce of your choice, and of course salt and pepper.

  • Fill your mug about halfway with noodles
  • Add water just above the surface of the noodles
  • Microwave for 6-8 minutes. Taste a noodle for doneness
  • Pour out the hot water, add sauce, microwave for 20 seconds
  • Then you’re all done! Enjoy!

3 Minute Oatmeal: You’ll need either a pouch of instant oats or traditional oatmeal, dried or fresh fruit, brown sugar, and of course water.

  • Pour oats in the mug, add water to the same level of oats
  • Microwave for 3 minutes
  • Add fruit, brown sugar, or any topping of your choosing!

Chocolate Chip Cookie:

Ingredients-

  • 1 Tablespoon unsalted butter
  • 2 Tablespoon brown sugar, firmly packed
  • 1/2 teaspoon vanilla extract
  • A pinch of salt
  • 1 egg yolk
  • 3 Tablespoons all-purpose flour
  • A handful of chocolate chip

Directions- Microwave butter for 30 seconds. Add sugar, vanilla, salt, and egg yolk. Mix until smooth, then add flour. Mix, then add chocolate chips. Microwave for 40-60 seconds and you’re done! Add some ice cream on top for some pizzazz!

Of course, there are so many more possibilities when it comes to mug meals like mac and cheese, pizza, omelets, and so many more delicious recipes! I found most of my recipes from Bigger Bolder Baking to be more accurate with measurements and such. There is a whole tab within the website with so many innovative ideas for these cute, simple foods! Another website that I found useful is The Comfort of Cooking, where my inspiration for the chocolate chip cookie rooted! I hope these recipes were both fun and useful for all!

My Take on Lovely Indeed

Lovely Indeed is a blog that I recently found and have simply fallen in love, with both the design of their website and content! It has a cute but simplistic vibe that is exactly what I am aiming for when it comes to the style of my blog. The content is very short and to the point but extremely informative. After reading just one of their posts, I was hooked to learn more about different topics available within the website.

One of the huge pluses of this website is that it has an array of topics present! Their content ranges from DIY, travel and food to interior design and style. They even have a tab to purchase trendy items from the website like phone cases and accessories or home decor! This website truly covers everything! It is a very well executed blog that seems to be quite established. Lovely Indeed has even partnered with some big brands including Target, West Elm and Old Navy! They have even made appearances on The Huffington Post and HGTV.

Of course being that my blog is all about How To’s and DIY, I definitely gravitate more towards the content on their website geared towards that! Although, this blog is very family oriented being that Chelsea Foy, the founder of the blog, seems to incorporate her kids in some of the fun crafts and other activities! So this would be the perfect blog for new parents or even someone looking to have a creative outlet in crafting.

Looking in comparison to this blog, I can see what small changes I can tweak within my website to make it seem more readable and intriguing. For starters, when looking at Lovely Indeed I am most taken with the aesthetics of the photos. If I were to set up and stage my DIY’s I believe it would be more appealing. The other thing would be the writing style present. I think that is definitely a huge factor when it comes to reeling in your audience.

Overall, I have taken in so much from this beautiful and successful blog. Anyone and everyone should go check it out! This is one truly inspirational website!

Get Your Smoothie On!

When I was thinking of new content ideas I kept going back to my new favorite thing to make, smoothies! I have been so inspired lately, mostly from my favorite smoothie shop ever, Juiceland. I absolutely love their different, creative recipes and love trying all of their flavor combos but am suddenly on a massive budget (aka my spending money is dwindling). I used to rely on Juiceland to get my daily energy boost and fruit serving but recently I’ve had to figure things out for myself!

Here I have my favorite smoothie recipe that will both satisfy your sweet tooth and hunger for fresh fruits and veg! To Achieve all amazing smoothies, I use my trusty NutriBullet! It is the perfect, compact blender for the average college student! Check them out through the underlined “NutriBullet”!

TIP: Depending on how much liquid you add will determine how thick the consistency of your smoothie will be. Some days I really want a hardy smoothie bowl with toppings and other days I’m on the go and need a quick, drinkable smoothie. So whatever you’re feeling, these recipes are flexible for either!

So let’s get into this! I have some pictures going along with my everyday go-to smoothie!

For this recipe you will need:

  • frozen spinach
  • frozen peaches, mango, papaya and strawberries
  • fresh ginger root
  • honey
  • coconut water ( I love the pineapple flavor )
Start by adding your solid ingredients to the blender.
Then add your liquid and sweetener of choice.

Here is the finished product! Both healthy and tasty yet so simple to make! Since my recent adventure to cut out bought in-shop smoothies, I haven’t had the urge to go out and get one any longer. I’ve been able to fine tune my favorite flavor combos to my personal liking to the point where that’s all I crave! It is such a nice feeling to know that I can rely on myself for a delicious treat right in my own kitchen. I hope this was of use to you all! So go try it out and you’ll thank me later! Remember that sometimes you just have to put your mind to things and do it!

Voila! The perfect smoothie bowl!
And of course, you can always just leave it as a regular smoothie!

Lastly, a little bonus recipe! This is the smoothie bowl I go to when it’s really hot outside and want a refreshing treat after a long day. This recipe is just as simple as the first if not more simple! Blend it up and you’re all set!

Ingredients:

  • mango
  • pineapple
  • banana
  • coconut flakes
  • water or coconut milk (depending if you want it creamy or not!)
  • and of course, granola of your choice

Let’s Decorate Some Succs!!

Succulents are one of the biggest trends of 2019 and lets be real, I am totally loving it! I have five succulents that are thriving but don’t look the cutest in their original terracotta pots. I thought this would be the perfect idea to revamp what I already have and give you guys the chance to pick up some inspiration or even follow along and do it yourself! What I love about this DIY is that it is both fun and a cute way to brighten up your space! Not to mention, budget friendly. So come along with me and see how my little guys turned out!

Me being me, I was having way too much fun being creative and forgot to take some photos along the process. But basically, all you really need is a few key items:

  • acrylic or spray paint
  • painters tape or washi tape ( I suggest using a more durable tape being that the washi tape tends to let the paint seep through)
  • any kind of paint pens ( I used sharpie brand; my favorite)
  • paint brushes/ sponges

Grab your favorite colors of paint and lets go! I found most of my inspiration from Pinterest (here’s a link to my succulent inspo board) and wanted to see if i could put my own twist on them! You can be as creative as you want with these. They’re yours so why not spice it up to your style?

First thing’s first, figure out your design. Once you have that decided, tape up your pot and get going!

For this one, I was really inspired by color blocking. Once it was dry, I decided to add some irregular black lines with my paint pen (pictured in the end results). There is no right or wrong to this thing, so do what your heart desires!

Here’s a few pictures of the finished results! I am so happy with how these came out and honestly wish I had a few more succulent pots to decorate. Just remember to be as creative as you like! I hope this little blog post was of use to you and really hope you decide to make some of your own!!

All About Compound Butter:

I am very excited to bring to you an easy twist to your average, everyday BUTTER! One day, in my high school culinary class I was brainstorming for one of my upcoming four-course meal competitions and discovered compound butter! It’s basically an elevated version of butter with herbs and seasonings added in. It sounds very simple and, in fact, is very simple to make, but it is so versatile! I’m going to show you just how flexible it really is.

First, how to make it! There really is no set recipe for this little creation, but here’s a basic guideline:

1.) Start with softened butter. I generally go with about a half a stick to save some for future uses. I always use unsalted so I can control the amount of salt I put in.

2.) Mush butter in a bowl with a fork or spatula until it’s a smooth consistency.

3.) Add your herbs/ seasonings. Here’s some ideas: fresh minced garlic, finely chopped rosemary, chives, or parsley. Then salt and pepper. Add a pinch of each seasoning and about a palmful of herbs to desired taste.

This image has an empty alt attribute; its file name is 263bd1f9-99d4-4798-bc3a-9963666c50b9.jpg

4.) Whip the ingredients together thoroughly, spoon out onto saran wrap and roll into a cylinder.

This image has an empty alt attribute; its file name is 3657ca33-2aba-41e0-bc54-243bd38c25e2.jpg

5.) Refrigerate until hard, then slice and use! Voila, you just made compound butter!

Just remember that you can be as creative as you want with it! I suggest playing around and trying different ingredients per what you are using the compound butter for. Say you’re making something already very flavorful on it’s own (like steak!) and just want to compliment the dish, use less! If you’re using it for something more bland like steamed veggies for example, go more wild and add some fresh minced garlic. Play with the flavor profile of the main dish the veggies are going with.

My favorite part about this special butter is that you can make it with dried herbs instead of fresh, so if you don’t have fresh herbs lying around you can still whip it up really quick without all the prep!

To show you how truly versatile this butter really is, I chose to make one of the most simple staples of all time; a grilled cheese sandwich. Anyone can add a little more spice in even the simplest of foods! In this compound butter I just used :

  • garlic powder
  • onion powder
  • dried parsley
  • salt & pepper
  • and of course, butter!

Because I’m no expert, here’s a link to DearMartiniKitchen’s YouTube video with some really great ideas and flavor profiles! It also shows a visual of her making a tasty whole grain mustard & brandy butter! https://youtu.be/mm3DUEGwZgk

This is me!

A very positive influence is my childhood friend, Emily (on the right). She is always inspiring me to be the best version of myself!

For starters, this is my very first ever blog and I can’t explain how excited I am to start this up! Just a little background, I’ve always been very interested in new, innovative things, such as: creating DIY’s or How To’s that can be used for many different purposes. With my inspiration I think it would be fun to actually be coming up with new ideas for others instead of being the viewer! I also have a love for culinary and think it would be fun to explore some interesting but easy recipes and food hacks. I can see this being my outlet for just these things!

Thinking of who I want to appeal to for my audience, I really want this to be a resource for anyone and everyone! Although, I do really see this blog being more targeted to the common college student and/or someone who is just starting out in the real world. Someone who may not have the knowledge of some things but is open to creating and learning through my posts! I really want my content to be focused on useful information that will encourage people to try something new. Even if it means tweaking an average recipe or common thing into something more elevated; I want it out there for people to use or gain creativity from it!

As for the name of my blog, I knew I wanted something simple and meaningful to me. My family and friends have always called me “Elle” even though my name, Ellie, is pretty short as is, but it seems to have stuck! When someone calls me that, it lights me up, reminding me of all the happy times throughout my life. The meaning behind “Sun” is just the fact that my goal for this blog is pure positivity and what’s more happy than the sun itself? I also wanted to incorporate “sun” being that my parents have always told me to “be the light”. It has always been a huge symbol of who I am as a person today and that you should always rise above and be your best self!

Check out and follow my Instagram and Twitter pages! Here are the links: https://www.instagram.com/elliebissonett/ https://twitter.com/elliebissonett